Home Page
The Home page is the screen you see when you open the web UI, and the one you will use most. It shows what the HTP-1 is doing right now and gives you quick control over volume, input, and a handful of other settings. The Home page always uses a dark display style, even if you have turned off Dark Mode on the Personalize page.
Almost everything on this page is optional. What appears here — which status cards, which mode buttons, which Dirac Live slots and macros — is controlled from the Personalize page.
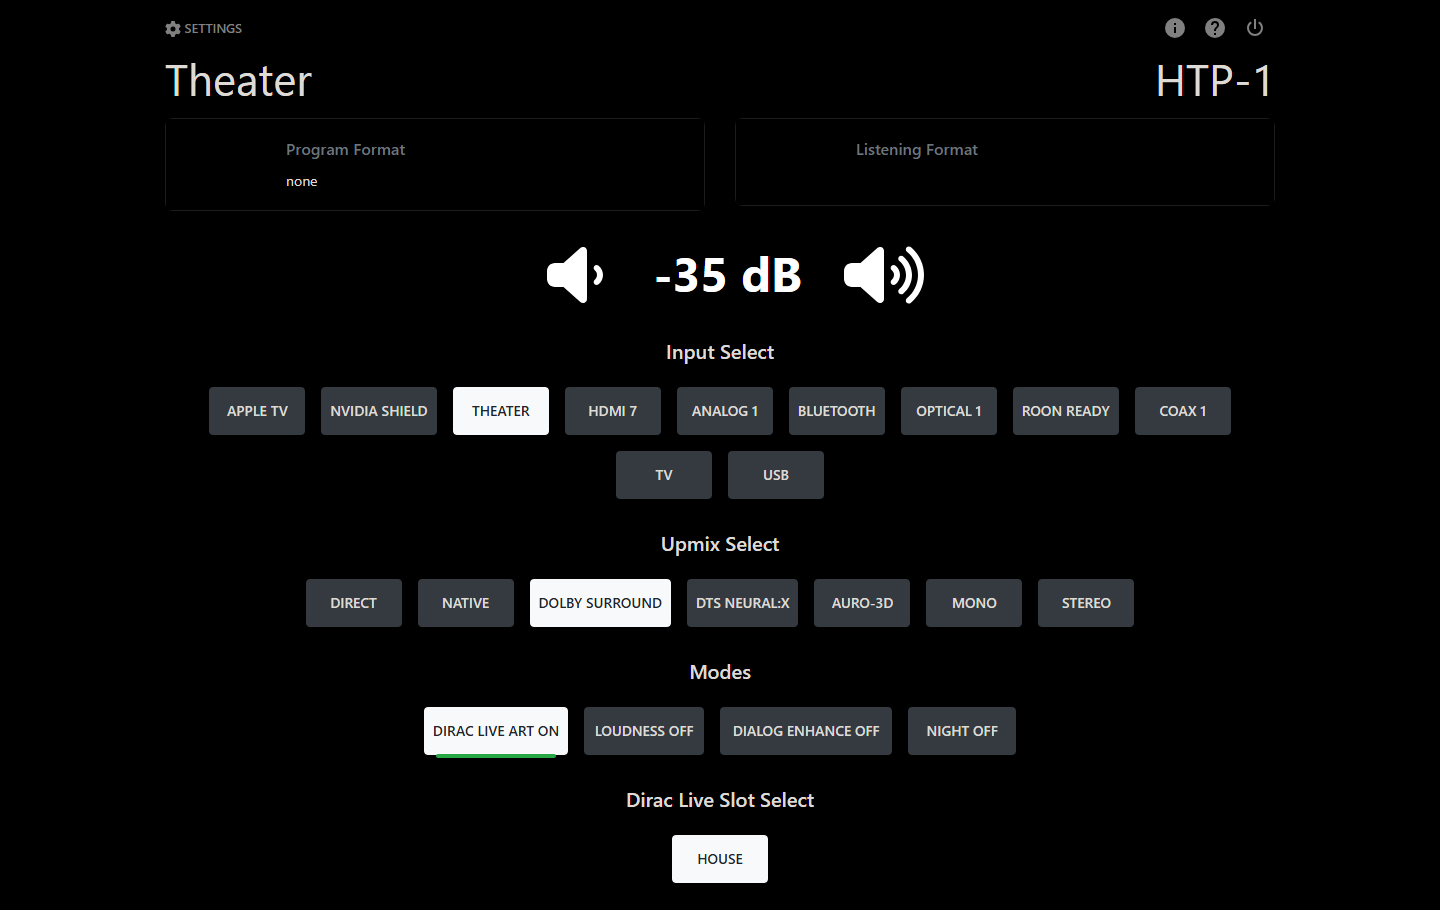
Status Cards
Up to three cards sit at the top of the page:
| Card | Shows |
|---|---|
| Program Format | The incoming audio format and source, for example the codec being decoded. |
| Video | The video resolution, color space, video mode, HDR status, bit depth, and 3D status. |
| Listening Format | The format the HTP-1 is currently outputting, including the active upmix mode. |
The Video card only appears if it is turned on in Personalize. Program Format and Listening Format can also show the sample rate, if you have turned on "Display Audio Sample Rate on Homepage" in Personalize.
Header Icons
The gear icon in the upper left (or the hamburger menu icon on mobile) opens the settings sidebar. In the upper right, the information button is where you update the system — it leads to the software version and update controls described in System Status and Updates and Support. The question mark beside it opens the on-device help for the current page.
Top-Left and Top-Right Labels
In desktop mode, you can show a label in the top-left and top-right corners of the page — either the current input name or the unit name. Tapping the label takes you to the Inputs page or the Device Settings page. Choose which label appears, if any, on the Personalize page.
Main Volume
Press the down or up volume button to change the volume by 1 dB. Press and hold either button to change the volume continuously. Tap the dB reading between the two buttons to mute or unmute. The displayed Main Volume uses the scale configured with Zero Point on the Volume Setup page.
Mix Out Volume
If your HTP-1 is set up to use the Mix Out volume display, a second volume control appears below the main volume, labeled Mix Out Volume. It works the same way — press, long-press, and tap the dB reading to mute — but it controls the level of the Mix Out output rather than the main speaker outputs. Turn this display on or off from Personalize. Mix Out has a range of −100 to 0 dBFS and is not affected by the Main Volume Zero Point setting.
Input Select
Tap a button to switch to that input. Only inputs you have marked visible on the Inputs page appear here. Tapping the "Input Select" heading takes you to the Inputs page.
Upmix Select
Tap a button to choose an upmix or surround mode. Only modes you have marked visible on the Upmix page appear here. Tapping the "Upmix Select" heading takes you to the Upmix page.
Modes
The Modes row can hold any of the following buttons. Each one is turned on or off individually in Personalize, under Homepage Modes.
| Button | Behavior |
|---|---|
| Dirac Live | Three states: off, bypass, and on. |
| PEQ | Two states: on or off. |
| Tone Control | Two states: on or off. |
| Loudness | Two states: on or off. |
| Dialog Enhance | Steps through the available dialog enhancement levels. |
| Night | Three states: off, on, and auto. |
| Wide Synth | Two states: on or off. |
Three additional controls use a pair of plus/minus buttons instead of a single button:
| Control | What it adjusts |
|---|---|
| Lipsync (Input Delay) | The lip-sync delay for the current input, in milliseconds. |
| Tone Bass | The bass level for Tone Control, in dB. Tap the reading to jump to the Tone Control page. |
| Tone Treble | The treble level for Tone Control, in dB. Tap the reading to jump to the Tone Control page. |
Note
The Tone Bass and Tone Treble readings turn red when Tone Control is off, since adjusting them has no effect until you turn Tone Control on.
Dirac Live Slot Select
If you have turned on any Dirac Live slots in Personalize, they appear here as a row of buttons. Tap a slot to load that calibration. A slot that has not been calibrated yet is labeled "Uncalibrated." Tapping the heading takes you to the Calibration page.
Macros
If you have added macros to the Home page in Personalize, they appear here in two rows: your remote-button macros, then any additional macros you created in the web UI. Tap a macro button to run it. See Macros for how to record and name them.