Dirac Live
The Monolith™ HTP-1 supports Dirac Live® room correction. Using a calibrated microphone, the system listens to the response of your room and your speakers and applies corrections to make the system more linear and hence more correct. Calibration itself is done with the Dirac Live app on a PC or Mac; the result is transferred to a filter slot on the HTP-1, described in Calibration.
The calibration system addresses several aspects of the system:
- It sets the delays on the speakers. Sound travels about one foot per millisecond. The delays are designed to ensure that sound from all speakers reaches your ears at the same time. If the delays are not set correctly you are likely to perceive a sound in the center as coming from one side or the other.
- It sets the trim for each speaker. Different speakers and amplifiers produce a different sound level for a given amplifier power. Distance also plays a role. Speaker trims are included so that the same sound from each speaker reaches your ears with the same loudness.
- It corrects the frequency response of the system. The frequency response of speakers is often not flat. The Dirac Live system measures the frequency response and renders it flatter.
- It provides measurements of the frequency response of each of your speakers, allowing you to set up the crossovers in the bass manager. The frequency response measurement reveals the low-frequency performance (the cutoff frequency) of each speaker. This is the information you need to set up bass management.
You should do a Dirac Live calibration. Setting up your speakers correctly is a key part of getting the best sound out of your system.
Note
The screenshots of the Dirac Live app on this page show the app itself, which looks the same regardless of HTP-1 firmware version. Screenshots of the HTP-1 web UI on this page are current.
Before You Start
- For a normal calibration, turn PEQ off or use Pre placement. The calibration signal bypasses Pre PEQ but passes through Post PEQ, so active Post filters are included in the measured response. See PEQ placement for advanced uses. Tone control and Loudness are automatically disabled during calibration, and User Delay and User Trim are set to zero.
- Use the Speakers page to enable all of your speakers. Don't worry about crossover settings yet, but set any Dolby Atmos Enabled speaker groups to Dolby before calibration. They should then appear in Dirac Live with "Atmos" in the speaker name, and Dirac Live will preserve their specially designed frequency response.
- A calibrated USB microphone is required. Using an uncalibrated mic, or a laptop's built-in mic, will skew the frequency response of your system.
Dirac® calibration requires a PC or Mac laptop running the Dirac Live app with an external mic attached to the laptop.
Note
The HTP-1 requires the desktop version of Dirac Live. The mobile Dirac Live app cannot be used because the HTP-1 does not provide the external microphone support required by the mobile app.
Calibration Steps
Complete the basic setup first — be able to play sound through your speaker set.
- Download and install the Dirac Live app: https://live.dirac.com/download/. Use the latest version for the best results.
- Attach a calibrated USB microphone to the computer.
- Launch Dirac Live and log in. The ownership of the HTP-1 conveys a license for basic Dirac Live usage.
-
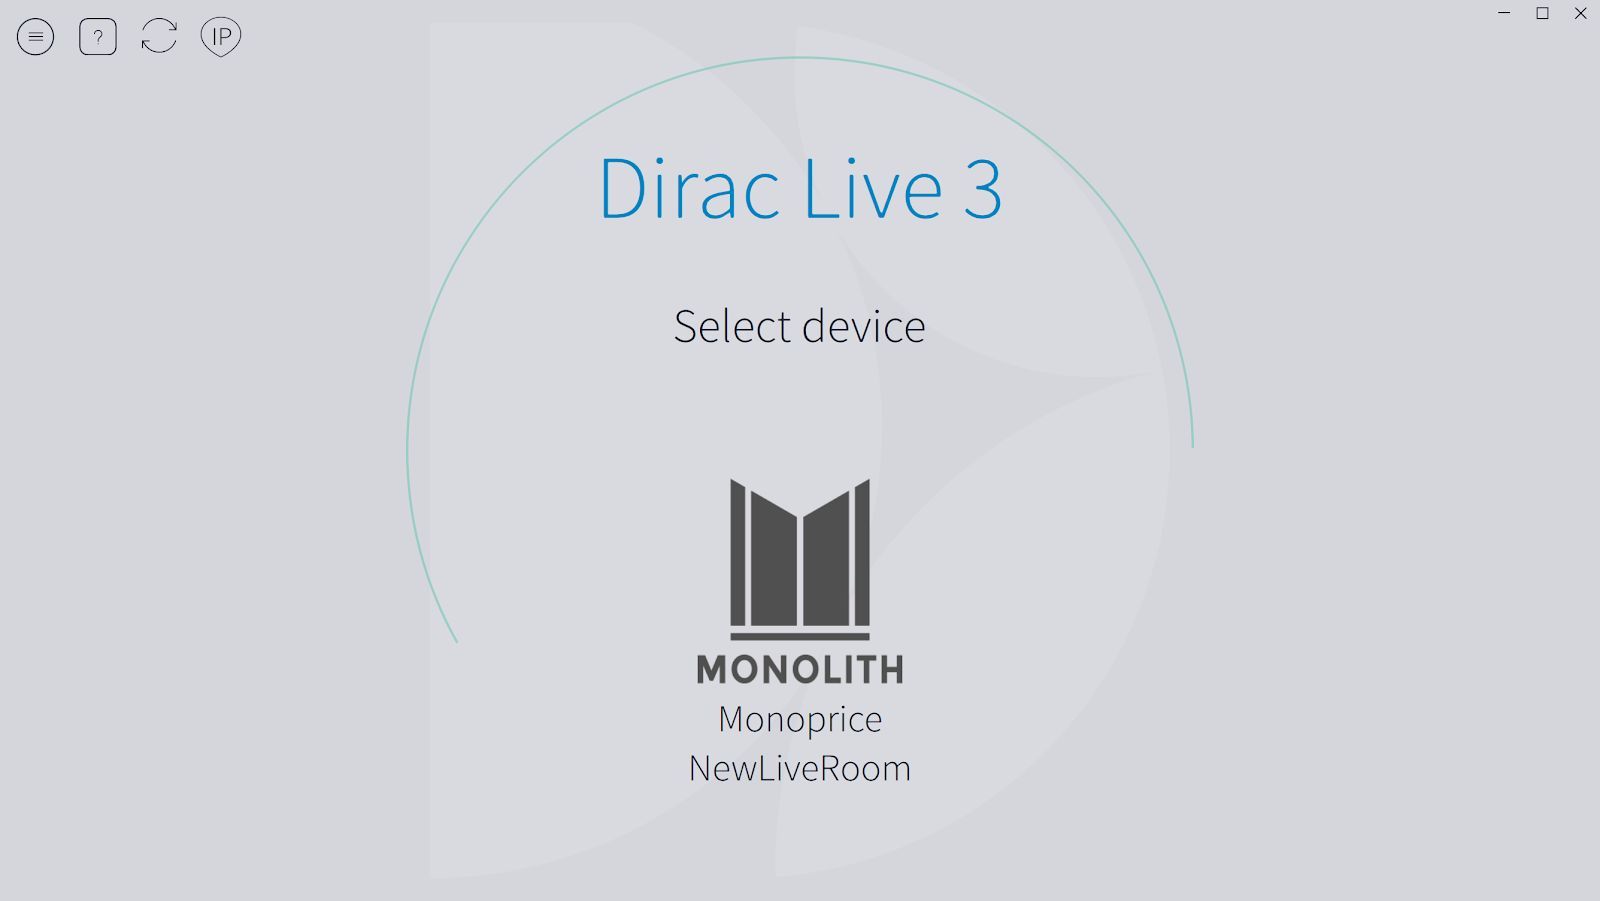
Open Dirac Live and connect to the Monolith HTP-1. The Dirac Live app finds the HTP-1 using common networking protocols. The name it shows is the HTP-1's name, set on the Device Settings page.
-
Choose the microphone you have connected.
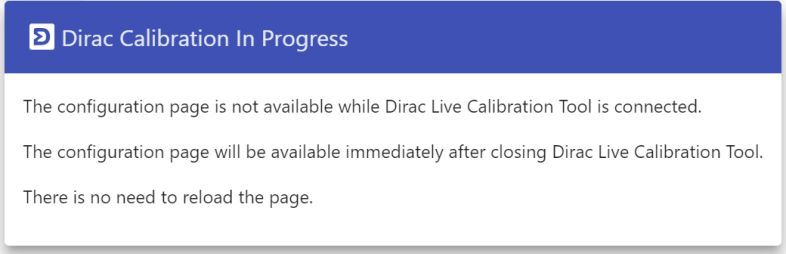
- The HTP-1 web UI is read-only while a Dirac Live calibration session is connected — a banner tells you this, and the front panel and remote still work for volume. Closing the Dirac Live app restores normal control.
-
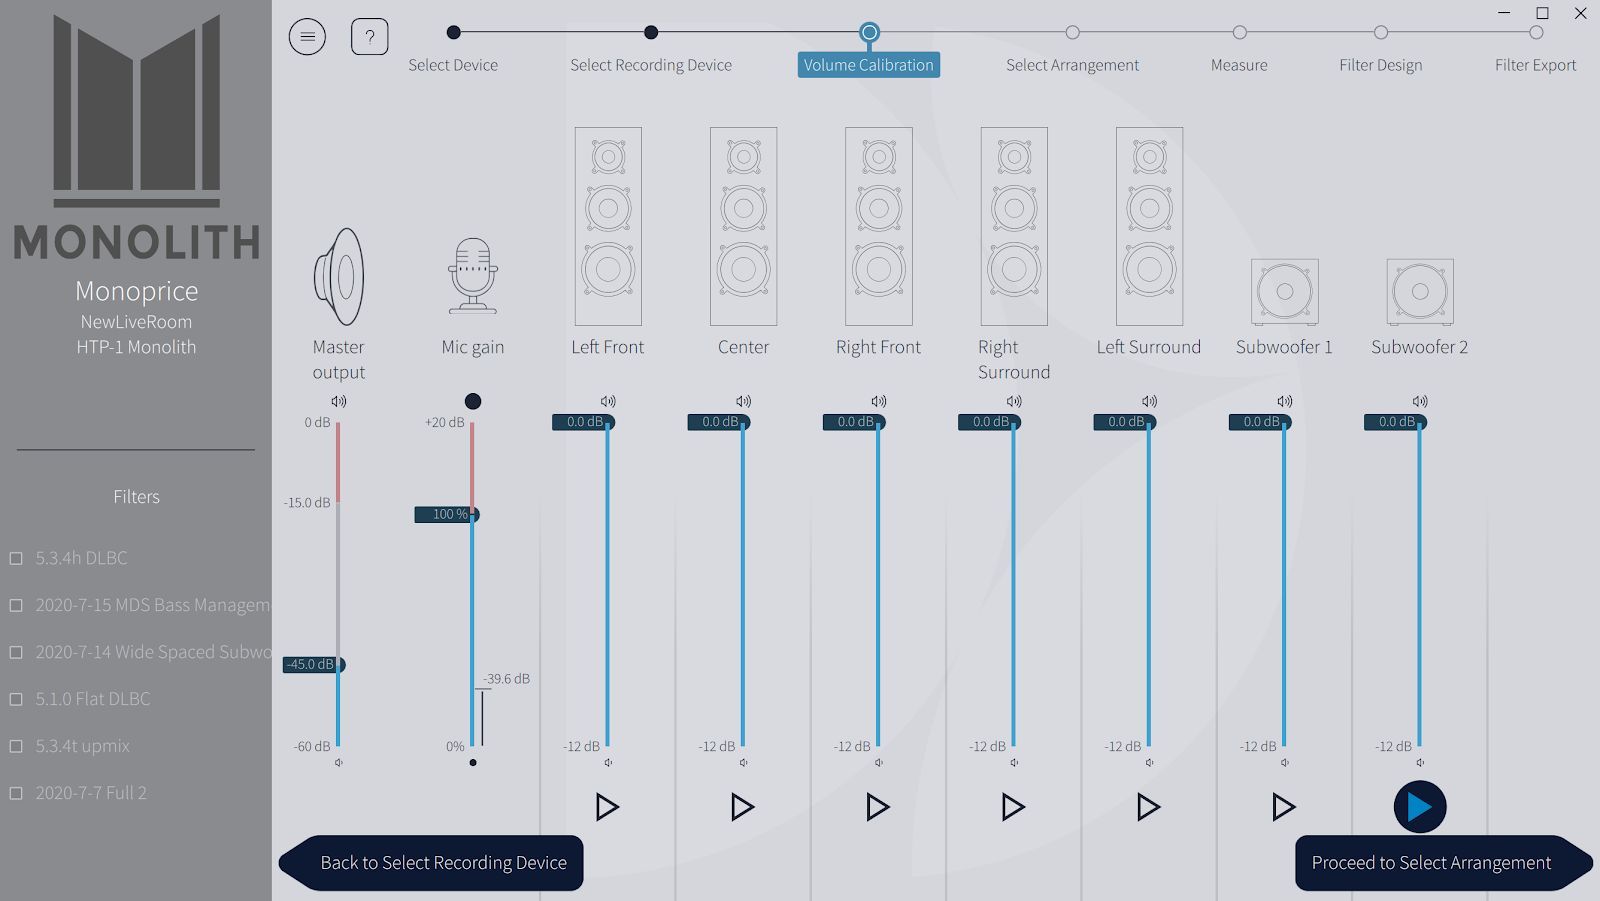
Set the volumes for calibration. The volume control on the left side of the Dirac Live screen matches the one on the remote control — you can adjust it with the remote. The app sets the volume initially to -34 dB.
Use the Dirac Live Volume Calibration screen to make sure the test signal is well above the room noise floor without clipping. A good target is roughly 20 dB of separation between the ambient noise floor and the test signal, with more being better if the room is quiet.
- Start with the master output low and raise the microphone gain until the background noise is just below the -50 dB mark, or barely peaking above it. If the room is noisy, reduce the mic gain and use a louder test signal level; if the room is quiet, you can use more mic gain and a lower test signal level.
- Move all speaker and subwoofer channel sliders to their maximum, then turn the subwoofer's own gain or level control down as a precaution. If the subwoofer has a low-pass filter, make sure it is switched off or set to the highest value.
- Click the play button for the left front speaker and slowly raise the master output until that channel plays at a comfortable level. The noise plays for about 30 seconds; press play again if you need to. Then click the play button for each speaker in turn and note which one is the softest. Omit the subwoofer for this step.
- Click the play button for the softest speaker and raise the master output until that channel reaches at least roughly -20 to -30 dB on the meter, which is about 20 dB above the noise floor. Then click the play button for the left speaker and reduce its level so it also falls into that range. Repeat this for all other speakers except the subwoofer.
- Move the subwoofer channel slider roughly to the same value as the loudest speaker, then click the play button for the subwoofer and turn the subwoofer's own gain or level knob up until it also reaches the same target range. Do not use the Dirac Live subwoofer slider for this step; the adjustment should be made on the subwoofer itself.
-
Proceed to the measure screen and hear the sweeps. When a measurement completes you'll see the frequency response displayed. A single sweep is fine for trying things out, but a good calibration uses more measurements.
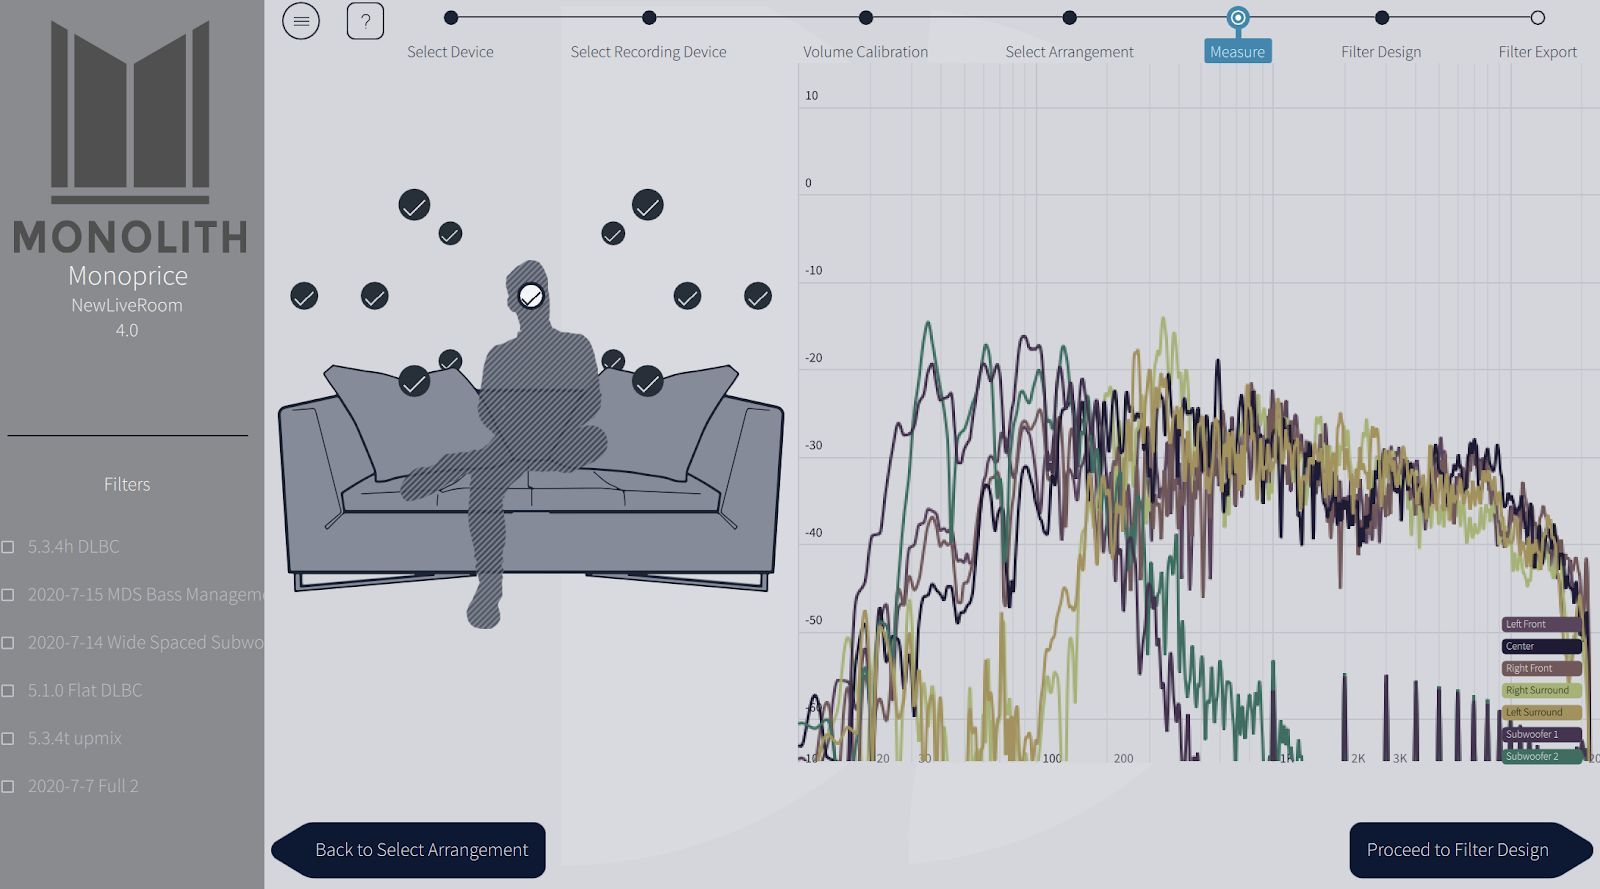
If the volume is too low, the calibration will fail for "missing samples" or "poor signal to noise ratio". If it's too high, it will fail with clipping. If a run fails, go back to the volume page and adjust. Also check that your speaker configuration is correct: if you set up for 7.1.4 but have only 7.1.2, the missing speakers show as "missing samples".
-
The Dirac Live app encourages multiple sweep locations. Try a calibration with one location first to become familiar with the process, then do a full set of measurement locations for a better correction.
-
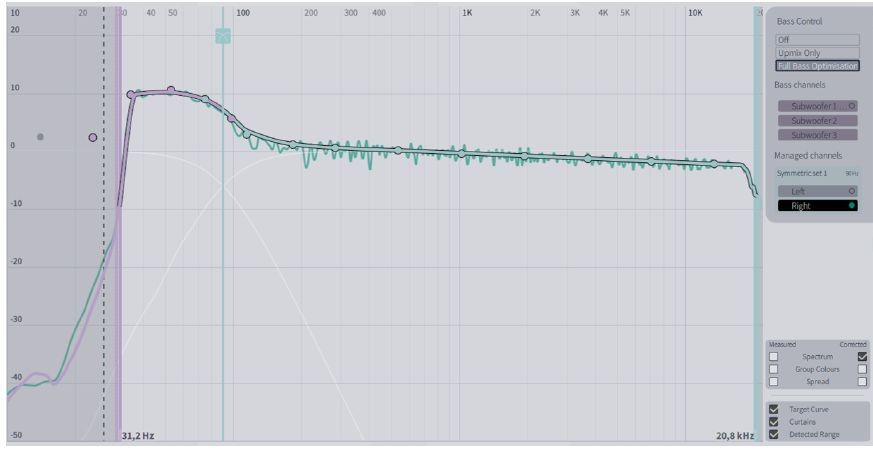
Proceed to the Filter Design screen and see the correction Dirac Live suggests. You can drag the left and right endpoints, investigate the cutoff frequency for your speakers, and grab the dots to adjust the target curve. With Dirac Live Bass Management you can drag the crossover point and recalculate. Dirac Live's default target curve has a slight downward tilt at the low end; most users want more bass than that default:
-
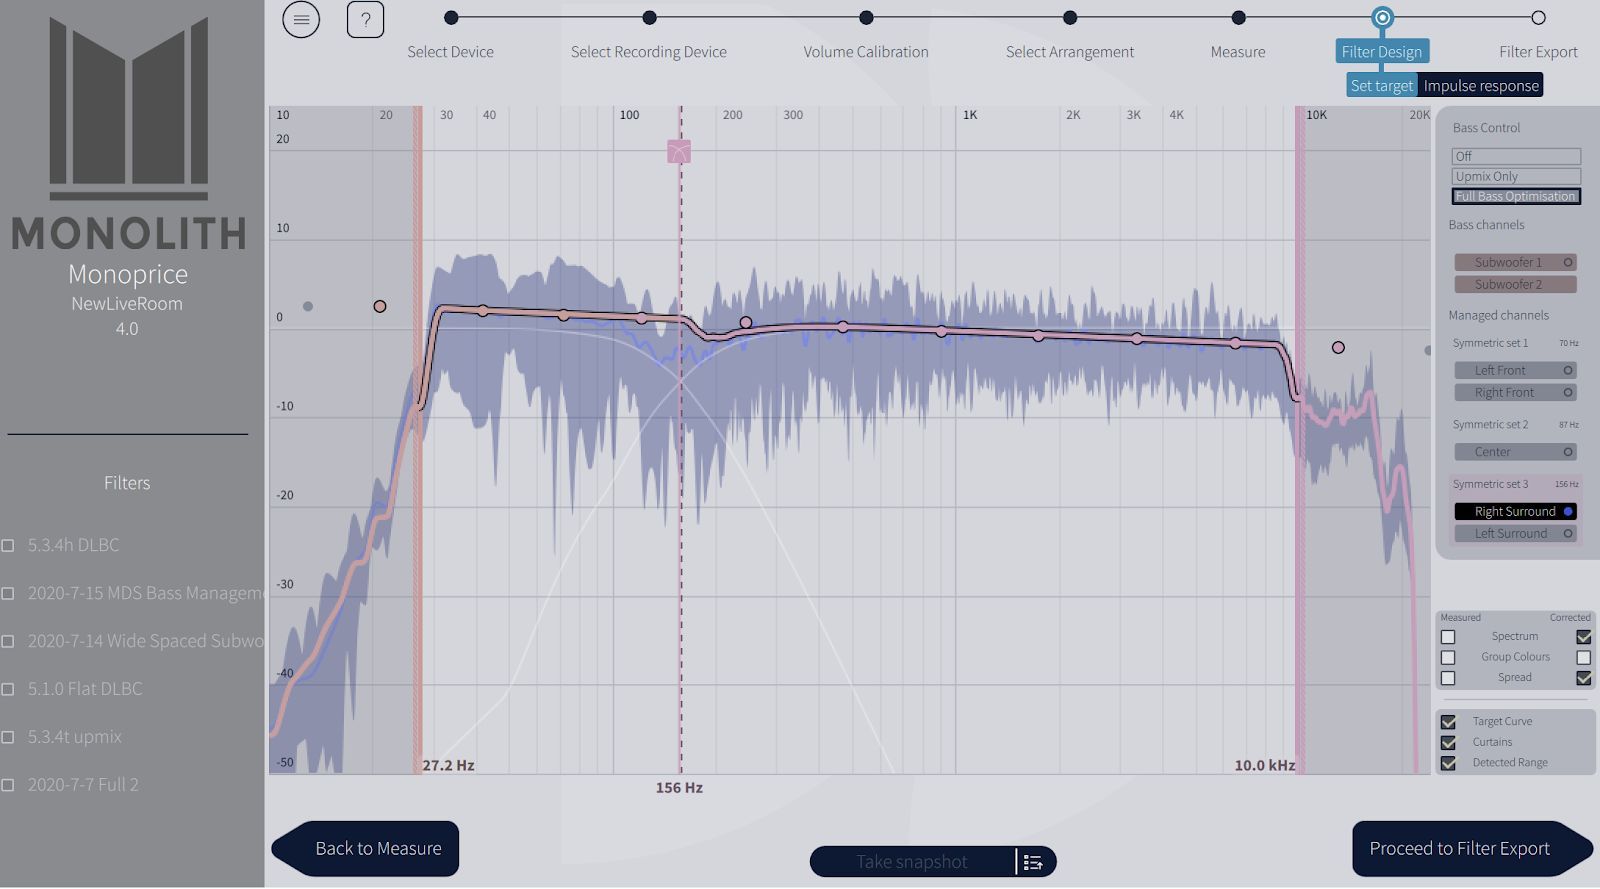
The "groups" at the right let you view one set of speakers at a time. The spread between measurements shows where more work is needed on the crossover and target curve.
-
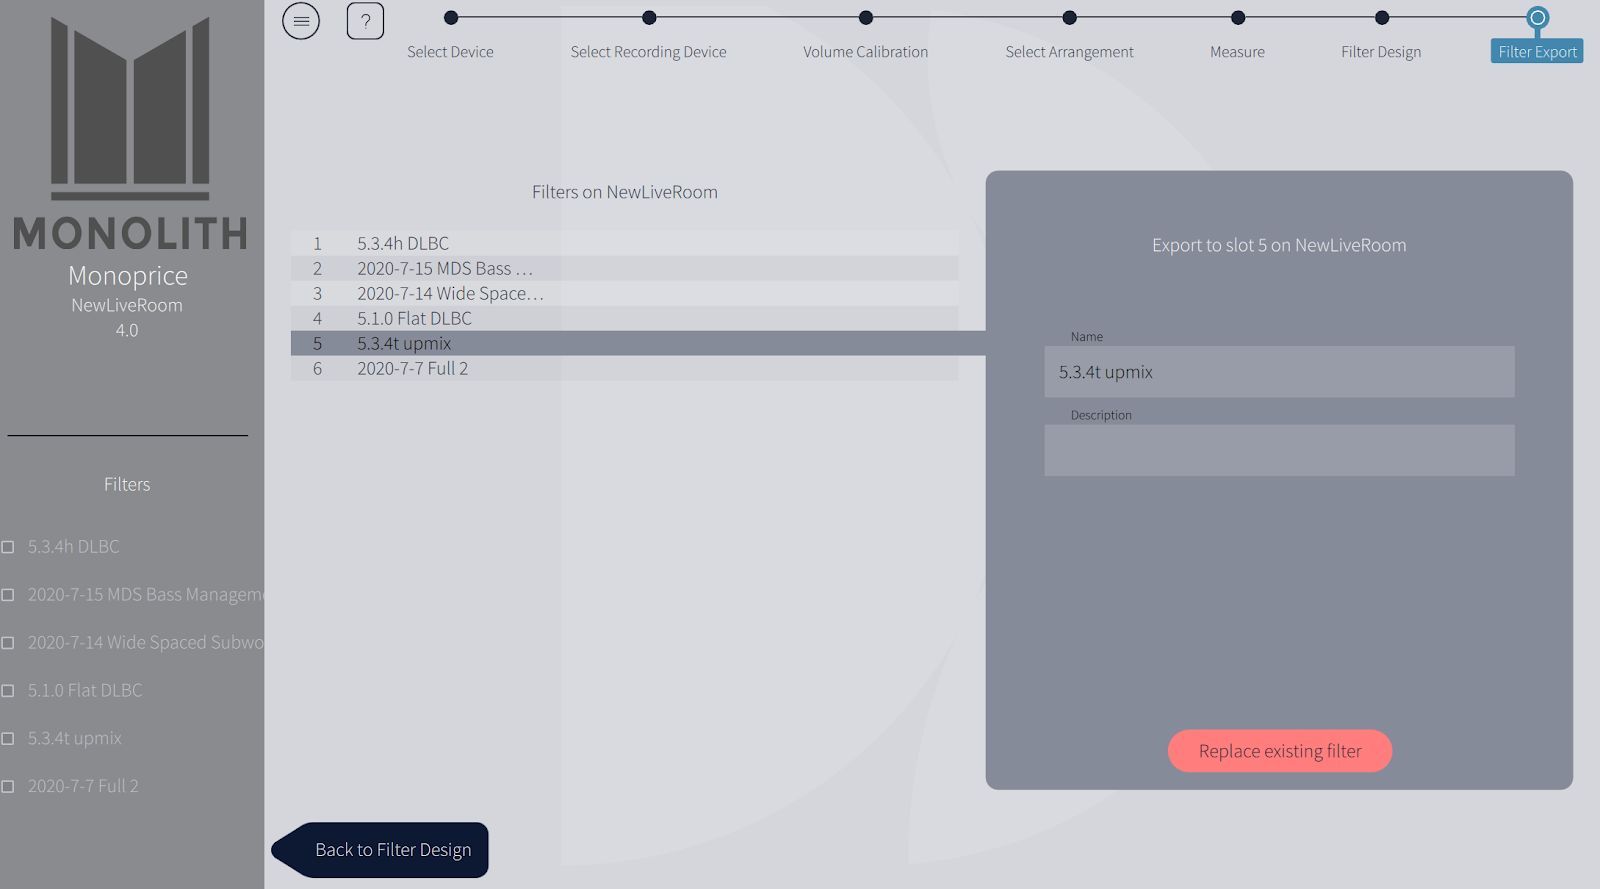
Choose a slot to store this calibration in. The HTP-1 has up to six Dirac Live filter slots (the exact number is shown on the Calibration page heading). You can store calibrations for different room configurations, like curtains open and closed, or for different speaker layouts. Dirac Live suggests the names of physicists and philosophers; this name is visible in the HTP-1 UI, so choose something meaningful to you. The description is not visible in the HTP-1 UI, but you can add your own note to the slot afterward — see Calibration: Notes.
-
Export the filter. This takes a minute or two. When complete, the resulting filter is installed and enabled on the HTP-1. You can see this on the Calibration page.
- Save the session as a Dirac Live "project" on your PC before you exit. Each project contains one calibration session and is tied to your HTP-1's serial number. A project can't be transferred to a different serial number, but you can ignore the warning that results from changing the name.
- Close the Dirac Live app. The read-only banner on the HTP-1 should clear. If it doesn't, launch the Dirac Live app again, then close it.
- Open the HTP-1 web UI and go to Calibration (
#/settings/calibration). If a calibration covers fewer speakers than your current layout, the uncalibrated speakers pass through without filtering, and the page highlights them as mismatched. -
The calibration delay and trim values shown are what Dirac Live measured, applied whenever that filter is active. Notice that the delay and trim on one channel may read zero — that speaker was farthest from the microphone during calibration.
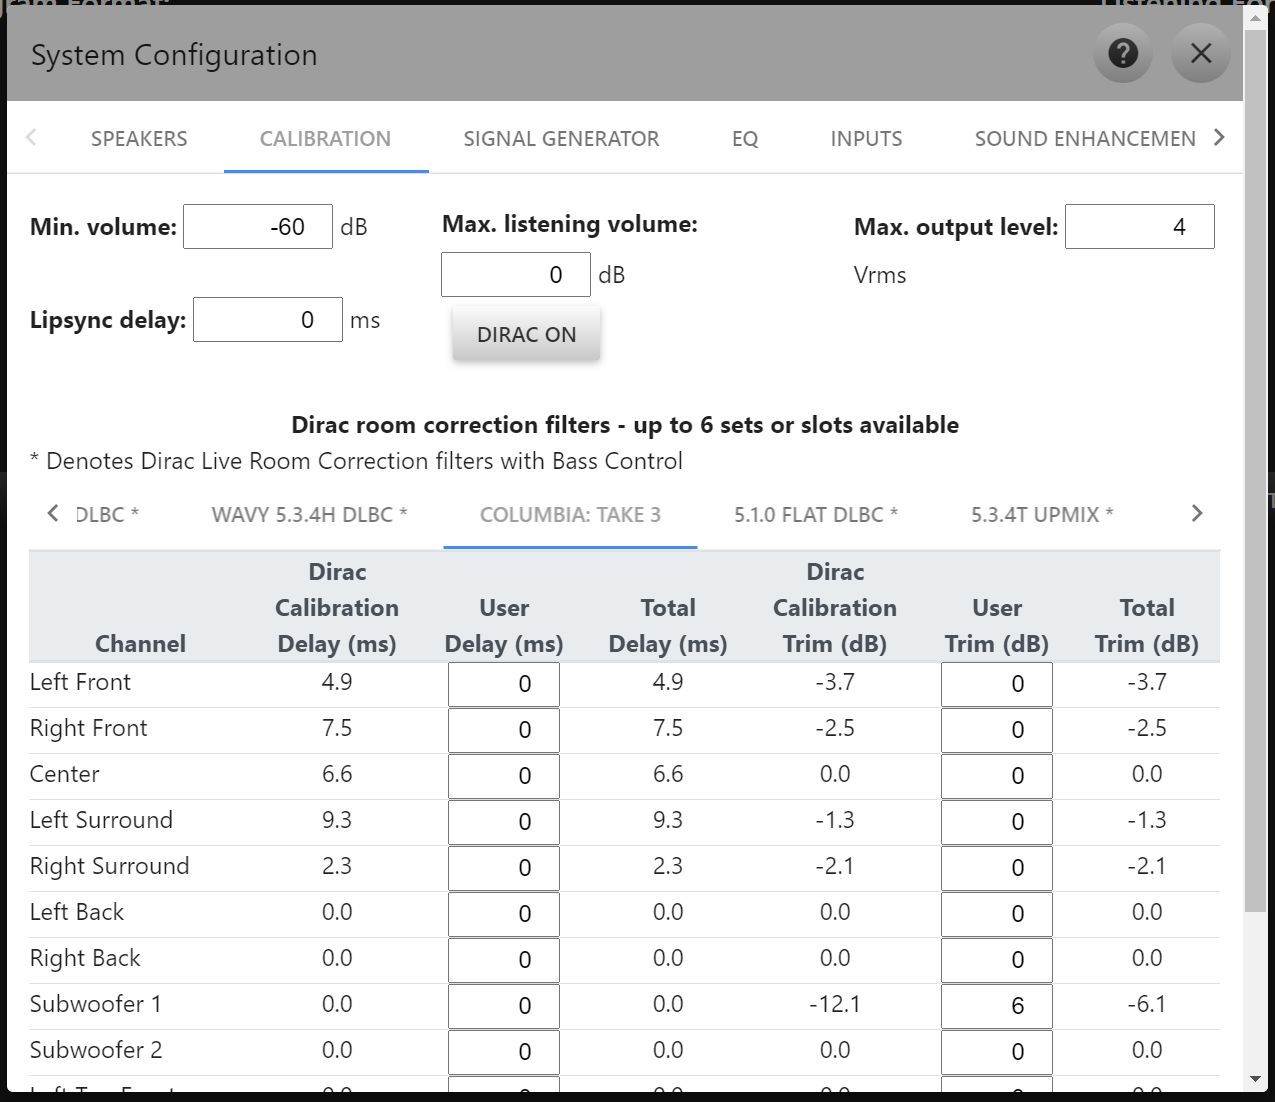
You can add User Delay and User Trim on top of the calibration values — see Calibration. These are only editable for RC and BM filters; BC and ART filters lock them, since adjusting delay or trim downstream of those calibrations would work against what the filter is doing. Total Delay cannot go below zero. Setting trim to a large value can work, but it sacrifices headroom you may want for other filters.
Dirac Live State: Off / Bypass / On
Clicking the Dirac Live button, in the web UI or on the remote, cycles the filter through three states. The button label names the loaded filter type:
Off
Dirac Live calibration delay and trim are ignored. User trim is still applied (for RC/BM filters). The HTP-1's own bass manager is used. The button reads Off.
Bypass
The room-correction filter itself is disabled, but the calibration's delay and trim values are still applied, along with any user delay/trim. The HTP-1 bass manager is used. The button reads Bypass. This lets you hear your system with delays and trims set correctly but without the spectral correction from the filter.
Note
The crossover frequencies of the HTP-1 bass manager are not automatically aligned with the crossover frequencies used by a Dirac Live bass manager.
RC On / BM On / BC On / ART On
The filter is fully engaged — calibration delay and trim, user delay/trim, and the room-correction filter itself are all applied. The button reads the loaded filter type followed by "On", for example ART On. When a BM, BC, or ART filter is on, the HTP-1's own bass manager is disabled so Dirac Live can handle bass management instead.
If the current speaker layout has no calibration in any slot, the button instead shows a single No Filter state.
With a Dirac Live calibration active, the system may sound noticeably quieter than with Dirac Live off because the calibration can apply substantial negative trim values.
Tip
If you switch between On and Bypass often, consider a macro that does it in one press. See Macros.
Dirac Live Status
A status pill next to "Dirac Live" on the Calibration and Home pages shows one of four states:
| State | Meaning |
|---|---|
| Inactive | No Dirac Live filter is loaded or active. |
| Active | The calibration is active and the filter is working as expected. |
| Warning | The calibration is in an unexpected state. Turn Dirac Live off and back on. |
| Error | The filter failed to load. Restart the Dirac Live server or the HTP-1. |
On Error, a Restart Dirac Live Server button appears. This restarts just the Dirac Live process, which is faster than rebooting the whole HTP-1 and is the recommended first step. A second copy of this button lives on the Device Settings page, under Danger Zone.
Tips for a Successful Dirac Live Calibration
Dirac Live is generally not too sensitive to small differences between calibrations, but a few tips can help it go more easily.
- Make an initial measurement (one set of sweeps only) in the center of the sound stage, equidistant from and between the front left and right speakers, even if there is no seat there. After calibrating, check this by comparing the front left and front right Dirac Live Calibration Delay values on the Calibration page — they should be equal or very close.
- For the first measurement only, the mic should be at ear height in the main seat. For the UMIK-1, the mic should point straight up, its tip at ear level, using the 90-degree calibration file.
- A single measurement is useful for testing, but won't give Dirac Live enough information for a calibration that sounds good — it may sound dry and dull. More data produces better results.
- Try to match speaker volumes using amplifier volume controls before relying on the sliders in the
Dirac Live app.
- Establish proper levels for all speakers, including the sub channel, at the start of calibration. Dirac Live reduces the gain of speakers that are too loud but does not add gain for speakers that are too quiet — a speaker or group that starts too low will pull every channel's final level down to match it, which can be frustrating and require a much higher master volume to reach normal listening levels afterward. User trims can absorb differences of a few dB; differences of 10 dB should be fixed at the amplifier instead.
- Take remaining measurements several inches above and below the first mic position. For example, if your seated ear height is 41 inches: take the first measurement at 41 inches, the next several around 49 inches, and the rest around 33 inches. Precision matters less for these later positions, but a consistent routine helps.
- No two mic positions should be closer than about a foot to each other, and don't reuse a position for multiple measurements.
- Keep mic positions at least a foot from reflective boundaries where possible. If seat backs sit close to a mic position, fully recline the seat during calibration.
- At every mic position, the mic tip should have a clear line of sight to every speaker except subwoofers. Reclining seats can help with rear speakers.
Calibrating for Higher Sample Rates
The Dirac Live filter itself does not run above 48 kHz; a sample rate converter drops the rate to 48 kHz range whenever the filter is active. Calibration runs at the sample rate of the active input. 44.1 kHz input is supported for calibration; 48 kHz is recommended.
Tip
You might reserve one filter slot just for a "user only" set of delay and trim values, with no room-correction filter loaded.
Room Correction Methods and PEQ
A slot's calibration is one of four types, shown as a small badge after the slot name:
| Type | What it is |
|---|---|
| RC — Dirac Live Room Correction | Standard correction; each speaker and subwoofer is treated individually. |
| BM — Dirac Live Bass Management | Like RC, but Dirac Live's own bass management replaces the HTP-1 bass manager. |
| BC — Dirac Live Bass Control | Like BM, with added optimization across multiple subwoofers — delays and filters are tuned to smooth the response over the listening area. |
| ART — Dirac Live Active Room Treatment | All speakers are optimized together as a matrix rather than one-to-one, using every speaker's measured capability to reproduce the content best at the listening position. |
BC and ART both require phase alignment that a later delay or trim change would disturb, so both lock out User Delay and User Trim on the Calibration page. Use Channel Levels for a permanent trim adjustment under either filter type.
Room Correction (RC) and Bass Management (BM) are included with the HTP-1. Bass Control (BC) and Active Room Treatment (ART) require separate licenses purchased from Dirac (https://www.dirac.com/products/monoprice-htp-1-monolith); if you already own a BC license it also works with ART.
A more comprehensive overview of Dirac Live ART™ is available at https://www.dirac.com/live/art-technology/.
Filter Storage and Slot Behavior
- Filters reload on speaker-layout change. Whenever the speaker layout changes, filters for the new layout are loaded into a cache on the DSP. While a filter transfers, a progress overlay shows on screen. Once cached, switching between installed calibrations for the same layout is fast.
-
Filters are layout-specific. If the current speaker layout has no calibration in any slot, a warning explains this and lists the layouts that do have a calibration:
Dirac Live is disabled; there are no Dirac Live filters available for the current speaker layout.
-
Mismatched layouts are flagged. If a calibration covers fewer speakers than the current layout, a warning appears and the uncalibrated speaker rows are highlighted on the Calibration page:
The selected Dirac Live calibration does not match the current speaker configuration. Uncalibrated speakers are highlighted.
Uncalibrated speakers are passed through without filtering. User delay and trim can still be added to them. - Subwoofer mismatches are not flagged. Using a calibration made with more or fewer subwoofers than your current layout will still produce sound, but not optimally: extra subs get a copy of the first sub's signal, and a layout with fewer subs than the calibration only gets the primary sub signal. - The Dirac Live app can affect HTP-1 slots. Deselecting all filters in the app disables Dirac Live on the HTP-1. Deleting a slot in the app removes that slot's user delay and trim on the HTP-1. Transferring a new filter into a slot resets that slot's user delay and trim to zero. - Speaker-dependent delay is capped at about 35 ms (roughly 35 feet, or 10.7 meters, of distance difference to the listener). If your room would need more, the applied delay may be zero for the affected speaker — worth knowing if you're calibrating a very large room.
Troubleshooting
The Dirac Live system is reliable once a calibration is applied and you're listening, but it can become confused while you're experimenting with multiple calibrations. The status pill described above is the first thing to check.

If the status shows a warning or error:
- Make sure an active slot is selected. If the selected slot has no calibration for the current speaker layout, no filter is applied and a warning appears. Select a slot that has one.
- Select an active input. A 48 kHz source is recommended but not required — see Calibrating for Higher Sample Rates.
- On a Warning, turn Dirac Live off and back on.
- On an Error, turn Dirac Live off and back on first. If that doesn't help, confirm a valid input is selected, then use Restart Dirac Live Server (on the Calibration page, or Device Settings → Danger Zone). This is faster than a full reboot and should be tried first.
- If none of that resolves it, force a cache reload by switching to a different, unused speaker layout and back to your original one. This reloads the Dirac Live cache the same way a reboot does, without the downtime.
Tip
Loading a large number of filters onto a large speaker layout can take a while — for example, filling all six slots for a 7.3.6 layout can take up to 10 minutes. If you're comparing speaker layouts, limit each layout to one or two calibrations to keep switching fast.
Speaker layout after upgrading from a 1.x release
Upgrading from any 1.x release resets the speaker layout to 2.0, so that you deliberately choose your actual configuration rather than calibrating against a stale one. Set the layout to match your system before running a new calibration.